Building construction

All knowledge related to building construction, civil engineering, r.c.c. work, finishing work, internal plaster, external plaster, waterproofing work

Thursday, May 2, 2019

INSTALLATION OF CPVC PIPE

May 02, 2019 0


INSTALLATION OF CPVC PIPE


Installation of CPVC pipes:
Manufacturer’s Installation Instructions shall be referred to during installation of CPVC pipes. However for general guidelines, refer to special requirements.
Cpvc pipe,plumbing,Installation of cpvc pipe,watersupply
CPVC pipe
Special Requirements:
1)    Pipes shall be cut to the required length using sharp edges cutter to have a square cut exactly perpendicular to the pipe which provides maximum bonding area for the joint.
2)    If cracks are observed during cutting, then the pipe shall be cut 50 mm beyond the crack and such cut piece of pipe shall not be used anywhere.
3)     Chamfering tool, file or pocketknife shall be used to give slight bevel at the cut end for easy entry of pipe into the fittings. Burrs, if any, shall be removed with the help of debarring tool.
4)    Pipes shall be wiped clean and made dry before installation of fittings.
5)    PVC pipes should be embedded with proper encasing for internal drain to prevent damages, cracks etc.


Application of two step solvent cement for jointing:
1)    Application of Solvent Cement shall be done in well ventilated area.
2)    The exact position of fitting shall be marked on the pipe surface as well as on fitting surface.
3)    Primer recommended by pipe manufacturer shall be applied to outside of pipe and inside of fitting.
4)     After the pipe surface becomes tacky, a thin even coat of solvent cement shall be applied to inner face of fitting and a thicker even coat shall be applied to outside face of pipes. Solvent Cement shall be as recommended by the manufacturer of pipes.
5)     Immediately after application of Solvent cement (i.e. Solvent Cement is still wet), pipe shall be inserted in the fitting by rotating ¼ to ½ turn while pushing, to ensure even distribution of cement within the joint.
6)     Fitting shall then be held in correct position for about 10 seconds, till an even bead of Solvent Cement is visible around the joint. If the bead is not continuous, it indicates that adequate Solvent Cement was not
applied.

7)    Solvent cure time is 1 Hr for 1/2” to 1” dia pipes and 2 Hrs for 1 ¼” to 2” dia pipes or as recommended by manufacturer.
8)    Adequate safety measures shall be taken as per pipe manufacturer’s recommendation, while applying solvent cement.
9)     After assembly the pipe section shall be placed in masonry chases at correct positions and clamped with plastic clamps (supplied by the pipe manufacturer) at 900 mm c/c for pipe dia less than 1” and 1200 mm c/c for larger pipe dia.
10)     Masonry surface shall be smooth and without sharp edges around the pipes.
11)      The entire pipe system is then Pressure Tested by first blowing out all air within and then filling it with water completely. Applied Pressure and time for testing shall be as per recommendation of the CPVC pipe manufacturer. During Pressure Testing no leakages should observed. If leakages are observed, concerned pipe sections shall be replaced with new ones.

Monday, April 29, 2019

INSTALLATION PROCEDURE OF EXTERNAL PLUMBING

April 29, 2019 0

INSTALLATION PROCEDURE OF EXTERNAL PLUMBING

External Plumbing

Pre Installation Procedures:
1)    A licensed plumber shall be employed to carry out all plumbing works and a Photo Copy of his license shall be kept ready for producing before any authorized agency coming for inspection.
Installation of external plumbing,method statements of plumbing,building construction
Schematic layout of external plumbing

2)    Approved plumbing drawing shall be made available on site.
3)    For CPVC pipes, technical literature and manufacturer’s user guide manual shall be made available on site
4)     Layout of pipes shall be marked on external wall surface as also on terrace and shall get approved from plumbing consultant. It shall be ensured that vertical lines so drawn are in plumb.
5)     Holes shall be made in parapet wall. Diameter of holes shall be 1” more than the respective diameter of pipes.
6)     In Over Head Water Tank and Under Ground Water Tank GI pipe sockets shall be provide as inserts at the inlet / outlet locations to avoid puncturing of RCC walls later.


During Installation Procedures (External plumbing):
Installation of GI Pipes:
1)    GI pipes shall be cut to the required length as per layout on walls and terrace. Coconut oil shall be used while threading.
2)    Pipes shall be cut at perfect right angles and burrs, if any, shall be removed by deburring tool. Round wheel cutter OR cutter recommended by manufacturer shall be used for cutting CPVC pipes.
3)    Number of threads in GI pipes shall be minimum 11 per 1” length, Pitch of threads shall be around 2.4mm and depth of threads shall be 1.48mm.
4)    All GI fittings shall be washed with kerosene to remove rust inside, prior to their installation.
5)           Fittings   shall   be   fitted   using   “Habak”   and   “Teflon”   tape   only    while    jointing    pipes. Vertical pipes shall be laid truly vertical by checking their plumb. Horizontal pipelines shall be truly horizontal. Slant piping shall be avoided.
6)      Adequate distance shall be maintained between main pumping lines and wall surface for maintenance purpose.
7)    Vertical pumping mains shall be double clamped near joints, connections, bends and turns to avoid bursting of pipes.
8)    Clamps for CPVC pipelines shall be of plastic or PVC as specified by manufacturer. (Metal clamps shall be avoided). Clamps for vertical CPVC pipelines shall be kept loose for free movement of pipes near expansion loop, if specified. Expansion loop shall be adequately supported.

9)    Entry of pipes through walls shall be at right angles.
10)     Pressure reducing valves shall be provided for high rise buildings and Control valves shall be provided for each branch line of OHWT. Control valve position shall be easily accessible for operating through toilet window, if possible.
11)      Foot valve location shall be kept 4” - 6” above tank bottom / sump level. Non return valves shall be provided near pumps.
12)     Vent pipes shall be provided for all outlets through OHWT to prevent air locks.
13)     Cleanout provision at bottom shall be provided for each line separately.
14)     Pipeline on terrace shall necessary run along parapet and be properly anchored to parapet wall with the help of saddles / clamps.
15)     Underground main GI pipeline including fittings shall be applied 2 coats of bituminous paint (Black Japan) before installation and shall be preferably supported on concrete pedestals.
16)       In case internal piping network is to be connected to outside water supply lines of different material, suitable adapters with sealants shall be used. Refer joinery at the end of this section.
17)      Open GI pipes shall be applied with oil paint as an anti corrosive treatment over a base coat of red oxide primer.
18)     Exterior grade latex paint shall be applied on CPVC pipes for UV resistance.
19)     In case, solar water heating system is provided, temperature control system shall be installed and adequate precaution shall be taken to avoid mixing of hot and cold water. Also GI hot water pipes shall be wrapped with wool piles and Aluminum foil for which minimum 1” clear distance between wall and pipe surface shall be kept.
Post Installation Procedures:
1)     After complete erection of pipeline and plugging open ends, flushing of entire pipeline shall be carried out by keeping only one of the pipe fitting open.
2)    Gravity pressure testing shall then be carried out by completely filling the entire pipeline with water for 24 hrs and leakages through pipelines, if any, shall be observed.
3)  If leakages are observed during Pressure test, necessary repairs shall be carried out which may involve replacing part of pipeline. Pressure testing shall then be carried out again.
4)  After the pressure test is successfully carried out, holes in masonry shall be filled with non-shrink grout and the grout shall be cured for at least 3 days.


Friday, April 26, 2019

INTERNAL PLUMBING AND DRAINAGE WORK PROCEDURE

April 26, 2019 0

Procedures

Internal Plumbing and Internal Drainage:

Pre Installation Procedures (internal plumbing / internal drainage works):

1)    A licensed plumber shall be employed to carry out all plumbing works and a Photo Copy of his license shall be kept ready for producing before any authorized agency coming for inspection.
Internal plumbing & internal drainage procedures, water supply line, drainage work

2)     It shall be ensured that base coat of toilet water-proofing is complete before staring any of the following procedure.
3)     It is necessary to have ledge walls for RCC shear walls for concealed plumbing network and the base coat waterproofing should be necessarily done before laying of ledge walls.

Wednesday, April 24, 2019

COST AFFECTING PARAMETERS IN EXTERNAL PLASTER

April 24, 2019 0


VALUE ADDED PARAMETERS / COST AFFECTING PARAMETERS IN EXTERNAL PLASTER


1)     Pure sand bags or equivalent can be used in place of river sand. It has advantages over river sand such as weigh batching and volume batching can be done as required. Also graded sand will give less wastage and easy storage & stacking can be done as required. The mix proportion with graded sand recommended by manufacturer is (1:6) which is cost effective as compared with river sand.
External plaster, building construction

2)    Cement mortar in river sand is highly recommended to be used for the first coat (1:6) and richer mortars for second coat (1:4).
3)    The cement mortar mix used in plastering of duct (wall having plumbing/drainage pipe lines) should be (1:4) for first coat as well as second coat and water proofing admixture is highly

PROCEDURES FOR WALL TILING - KITCHEN & DADO

April 24, 2019 0


Procedures for Wall Tiling for Kitchen and Toilet


a)Pre Tiling Procedures (Wall tiling/Dado)

1)    Latest Architectural Drawing shall be made available on site.
2)    Finished plaster surface shall be checked for right angles and diagonal shall be corrected for the same, if not found satisfactory.
3)    It shall be ensured that chases in masonry made for concealed piping are properly rendered with application of chicken mesh, non-shrink mortar and cured. It must be ensured that electrical boxes are fixed in position. All rendering works as well as minor repair works using mortar shall be cured using curing compounds or as directed by Quality Department.
Procedures for Wall Tiling for Kitchen and Toilet,method statements of tiling ,dado
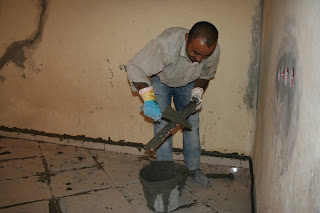
Wall tiling of toilet

4)    Wall tile thiyyas shall be taken before fixing of plumbing pipe outlets and wall tiling layout shall be clearly marked on the plastered surface with clear cut marking of starting point.
5)    Nominal mix proportions for mortar tile fixing shall be decided by Quality Department.
6)    Tiles (Ceramic and Glazed) shall be soaked by completely immersing tiles in water for about 3 Hrs. and then drained for a minimum period of 30 minutes prior to their fixing.
7)     If tiles are to be fixed up to ceiling level, ceiling level shall be checked for perfect horizontal level and necessary rectification shall be carried out to achieve the same, if required.
8)    The wall on which maximum plumbing work is done shall be chosen first for fixing of wall tiles.
9)    Plastered wall surface shall be wetted thoroughly 12 hours prior to time chosen for fixing wall tiles.


b) During Tiling Procedures (Wall tiling / Dado)

1)     It shall be ensured that quality of tiles checked from QA Department. Also proper sorting of tiles shall be done to have uniformity in color and shade. Starting point for each wall shall be followed strictly as per drawing.
2)    Ensure mix proportions from QA Department to form mortar of suitable consistency.
3)    Use of Liquid Tile Adhesive is recommended while making mortar.
4)    Mortar, thus prepared, shall be used before initial setting time of cement or cement fly ash mix.
5)    Use of neat cement paste for fixing tiles shall be avoided.
Circular holes of required size shall be made on tiles at appropriate positions as determined from markings on wall. Holes shall be made from back of tiles with the help of cutter machine.
7)    Mortar shall be applied to back of each tile (8-10 mm thk coat of mortar) before fixing in position and then tamped with rubber mallet to remove hollowness behind. Thickness of compacted mortar bed shall not exceed 8mm.
8)    For dado works in toilets, walls shall be marked with tile fixing layout with correct sizes of tiles to be fixed. Tiles shall be fixed from bottom second layer (full tile) to top leaving bottom most layer of tile. Each tile shall be fixed in plumb with tile thiyya piece using plumb bob. Also line dori shall be stretched between two corner tile thiyya pieces and all tiles shall be fixed in plumb with line dori. Bottom most layer shall be laid after fixing floor tiles. Bottom most tiles shall be cut to correct slope of floor laid, before fixing. Care shall be taken so that top edge of bottom most tiles thus fixed is perfectly horizontal. It should be ensured that bottom support should be removed 2 hrs after completion of wall tiling work.
9)     Fixing of wall tiles in other areas including passage (where no slope is given to floor) shall be done after floor tiles are laid and sequence shall be from bottom to top.
10)      Cement slurry shall be poured within the gap between tiles and plaster after every two courses of tile laying. This is to ensure that there are no voids left behind the tiles fixed.
11)     Cleaning of the tile surface should be done immediately after completion of laying of tiles.
12)     For other precautions to be taken, refer section of floor tiles. For kitchen flooring, slope should be provided towards Nahani trap and waterproofing should be completed to sunk portion of nahani trap and after completion of curing period flooring should be laid. The other procedure of kitchen flooring is same as regular flooring.

c) Post Tiling Procedures (Wall Tiling / Dado)

1)    Next day joints of tiles shall be raked little with thin metal sheet and filled with grout of matching shade and cured for at least 3 days.
It is recommended to keep one floor tile box (as spare) for each flat for initial maintenance / repair before possession and for subsequent handing over of remaining tiles to occupant.

Monday, April 22, 2019

PROCEDURE FOR SKIRTING WORK

April 22, 2019 0

Procedure for skirting work 


Skirting:

1)    Skirting work shall start after masking of joints in tiles is complete.
2)    It is recommended that skirting face shall be flush with wall plaster face and groove above skirting shall be avoided since dirt accumulates within the groove. However, architectural drawings shall be followed.
3)    Where Architect has particularly recommended skirting to fixed in offset with plaster, following precaution shall be taken:
Skirting work, tiling work,building work

a)  Wall plaster shall be completed in perfect plumb and line leaving a gap of height (50-100mm more than skirting height, at bottom).
b)  Temporary thiyya, using skirting tiles shall be taken from wall by fixing two skirting pieces, one at each end of the wall and line dori shall be stretched across them.
c)  Skirting tiles shall be fixed in plumb with the thiyya so taken.
d)  Gap above skirting shall be applied with plaster and trowelled flush with plaster above.
e)  This is to ensure uniform offset of skirting over plaster.
4)    Skirting edges and floor tile edges shall perfectly match.
5)    Skirting at offsets shall be matched at 45º to show a clean edge.
6)    Skirting shall be fixed in such a way so as to keep its top level in perfect line and level of plaster.

Friday, April 19, 2019

PROCEDURE OF FLOORING WORK

April 19, 2019 0

Procedure for flooring work 


Flooring

A) Pre Tiling Procedures (Flooring):

1)     Latest architectural drawing shall be made available on site indicating start point, joints, level, offset, type, color, size and laying pattern etc.
2)    Conduiting works, if required, on a slab surface shall be completed. Nahani traps as well as washing machine outlet pipe shall be provided as shown on the drawing.
Procedure for flooring work ,method statements for flooring work
Procedure of flooring work

3)    Slab surface shall be cleaned by chipping if required, and wetted thoroughly. The naked slab shall be treated with cement slurry with non-shrink material to avoid seepage of water below through shrinkage cracks, if any.