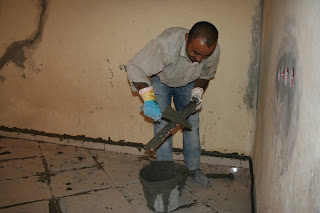
Procedure for flooring work
Flooring
A) Pre Tiling Procedures (Flooring):
1) Latest architectural drawing shall be made available on site indicating start point, joints, level, offset, type, color, size and laying pattern etc.
2) Conduiting works, if required, on a slab surface shall be completed. Nahani traps as well as washing machine outlet pipe shall be provided as shown on the drawing.
 |
| Procedure of flooring work |
3) Slab surface shall be cleaned by chipping if required, and wetted thoroughly. The naked slab shall be treated with cement slurry with non-shrink material to avoid seepage of water below through shrinkage cracks, if any.
4) Tile layout shall then be marked on the floor, with correct size of tiles, and clear-cut marking of starting point for fixing of tiles shall be done. Tile edges being kept at right angles to plastered faces of walls or as specified in drawing.
5) It shall be ensured that quality of tiles is satisfactory as per approved sample and proper sorting of tiles should be done to have uniformity in size, color and shade room wise.
6) Proper thiyyas of tiles shall be taken at all four corners of rooms where tiles are to be fixed and shown to the site incharge / site engineer before work begins. Floor level offset (1/2” minimum or as specified on drawing) and slope shall be considered while taking thiyyas for toilets and terraces.
7) Floor thiyyas shall be taken starting from stair landing and passage area first and then within the rooms, keeping proper offsets (if any) as mentioned on drawing. Thiyyas thus taken for entire floor shall be checked by site engineer before tiling is started in any of the rooms.
8) Finished floor level so decided shall be clearly marked on each wall.
B) During Tiling Procedures (Flooring):
1) Tiles (Ceramic and Glazed) shall be soaked by completely immersing tiles in water for about 3 hours and then drained for minimum period of 30minutes prior to their fixing in position.
Recommended mix proportion for mortar bedding should be used as per manufacturer’s specification and/or approved by Q A Department.
3) If mortar bed thickness works out to be more than 2”, then the additional thickness shall be made of by placing nominal screed concrete (PCC (1:3:6) mix or as specified by QA Department) and it shall be cured for at least 3 days and then fresh mortar shall be laid over it.
4) For laying of tiles alternatives below shall be followed:
A) Alternate 1:
➢ Once mortar bed dries sufficiently cement slurry shall be laid (cement or Cement+ LTA (liquid tile adhesive) as per manufacturer’s specification) over mortar bed and levelled using straight edge.
➢ Tiles shall be laid simultaneously as cement slurry or Cement + LTA is spread along with Bonding agent (if specified) and laying shall be done so that all joints of tiles match without showing any offsets.
b) Alternate 2:
➢ Mortar bed is cured for 3 to 7 days. Rich cement sand mortar (1:1) 4-5 mm thickness; using fine sand shall be applied over cured mortar bed.
➢ Tiles shall be laid simultaneously as rich cement sand mortar is applied and laying shall be done so that all joints of tiles match without showing any offsets.
For tiles of size 900 x 900 and above; alternate 2 shall be adopted.
5) Use of arrow marks at the back of tile shall be made while fixing tiles. Straightness of joints shall be maintained throughout. Tile fixing procedure shall be confirmed from the manufacturer, if required, or under special circumstances. This is especially required when a particular design pattern is required on the finished tile surface.
6) Each tile after placing shall be tamped with rubber mallet to form accurately leveled surface. Hollowness beneath the tiles shall be checked from time to time by tamping and checking the sound produced. Corners of tiles shall be specially attended to for checking hollowness beneath.
7) It is strongly recommended that all tile joints shall be maintained with the help of spacers (gap 1.5mm and above) and filled with approved sealant of matching / contrast color. However, architectural drawings shall be
followed.
8) Polyurethane foam of 5-6 mm thickness shall be provided along all four edges of room to cater for expansion of tiles where spacers are not provided.
9) Proper offsets as well as slope (1:100 recommended or as specified on drawing) shall be provided for tiles in toilets as well as tiles in attached terraces. Offsets shall be provided using 40x40x3 aluminium angles. As far as possible, threshold patti should be used.
10) Skirting tiles shall be fixed over floor tiles.
11) Antiskid tiles are recommended for stairs, toilets and attached terrace and joint free rectified tiles are recommended in kitchen area for hygiene consideration. It is recommended that floor tiles of swimming pool be fixed using LTA.
C) Post Tiling Procedures (Flooring)
1) Next day joints of tiles shall be raked little with thin metal sheet and filled with grout of matching shade and cured for at least 3 days. Use of half round tool shall be made for filling joints, where spacers are used.
2) After curing is over, joints of tiles shall be covered with masking tape to prevent entry of dirt into it and shall be covered with a layer of POP with paper underneath, for protection against scratches due to dragging of objects over them as also stains caused due to dropping of acids, detergents and other heavy objects and footmarks.
3) Natural stone tiles shall be polished after a gap 15 days after fixing of tiles and polished surfaces shall be well protected as above.
Staircase treads shall be checked for perfect line dori from topmost tread to bottommost tread.


No comments:
Post a Comment